.png)
How to Make Your Own Interactive Vocabulary Task
- Renee Anderson
- Apr 20, 2020
- 6 min read
With Distance Learning being the new "normal" in classrooms all over the world, teachers are being asked to recreate their teaching in a digital format. One cool way to do that is through the creation of Digital Interactive Notebooks. This tutorial is going to show you how to create your very own Interactive Vocabulary Task, and along the way you will get a good idea of how to create your own Digital Interactive Notebooks. If you'd rather watch a video tutorial, you're in luck! I've created a VIDEO TUTORIAL for this exact topic. You can choose to watch that or follow along here. Either way, you'll come out with the knowledge of how to create your own interactive vocabulary task slide in Google Slides, and your students will think you're awesome! Let's get started...
You need to create two sets of Google Slides. I typically name one "Prototype," where I build all of my slides, and the other I will name "Student." The "Student" set of slides will be shared with the students and will be the "interactive" slide deck.

Start by making sure that both slide decks have the same "Page Setup." Go to "File" and then "Page Setup" to choose your size. I typically choose the "Standard 4:3" page size. It is important that both have the same page size so that when we create the backgrounds for the student slides from the prototype slides, they are already the same size. If you don't do this, things will look funny, and nobody wants to deal with that...

You will start building your slides in the "Prototype" slide deck. Start with deleting all the unnecessary text boxes. Click on the edge of the box and then backspace to get rid of them. When the slide is blank, you are ready to roll.
To make things really simple, you can start out by creating a title for your slide. It can be anything you want that is pertinent to the topic your students are learning. In this example, I used "Word Art" to create a title called "Vocabulary Fun!" Click on "Insert" - "Word Art," type your title, and choose any font & color you'd like. The example font is "Henny Penny." For more info on the many awesome fonts Google Apps offer and how to add them for FREE, you can check out my Google Fonts Tutorial!

After you have a title for your slide, use a "Text Box" to create a space to write the directions for that particular slide. For the vocabulary slide, I usually write something like, "Drag the correct word to match the correct definition." I will often make the action word (Drag) a different color and also bold, so it stands out to students.

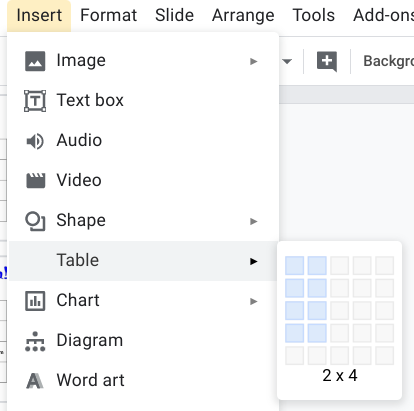
Now it's time to make the vocabulary portion of our slide. The easiest way to do that is to "Insert" a "Table" into our slide. We are going to be matching words to their definitions, so you will want to choose a table that is 2 x (# of vocab words). For the example, I only had 4 vocabulary words, so I used a 2 x 4 table. You can see what that looks like below...


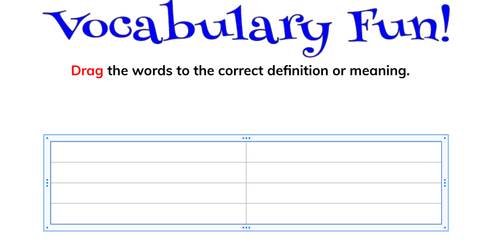
You can now resize your table so that it fits your slide better. That will just depend upon how may vocabulary words you have and how large the font is, etc. You can also take some time to change the color of the grid outline using the "Border Color" tool and also change the thickness of the grid lines using the "Border Weight" tool. I've chosen black as the border color and done a border weight of 2px. Notice in the image below, that I have also moved over the center table line by dragging it to the left. This makes my table ready for the definitions to be on the larger side and the words to be in the boxes on the left.


Here's an example of what the slide might look like with definitions typed into the larger part of the table. Again, this will vary depending on how long your vocabulary list is.

We are now ready to create the vocabulary words that become the interactive part of the notebook. We are going to use the "Shape" tool to select the rectangle shape. The rectangle shape can easily fit inside the table. Use the rectangle shape tool to draw a rectangle inside one of the boxes where a vocabulary word would go. You will notice that when you are done, there will be a gray box there. The default color for shapes is gray, but you can easily change that if you want.


Next, drag that shape off to the side of the slide, so it is no longer on the slide. We are going to make our vocabulary list on the side, and these will be the words the students will drag & drop into place. You will need to double-click inside the shape to type your vocabulary word. Choose any font size, type & color you want. I typically center all of my words, so you can choose to do that as well. This is also the time to be able to change the color of your box and/or the border of your box if you'd like. Just like changing the color of anything else, you will use either the "Paint Can" to change the box color and you can use the "Border Color" tool to change the color of your border. You can even make everything "Transparent" if you don't want to see a box at all and only want to see the words. Once you have your first box looking the way you'd like it to look, just Copy/Paste as many times as you need to create enough new boxes for all of your vocabulary words. In my example. I needed 4 boxes, so I used Copy/Paste, typed each new word in, then arranged the boxes how I liked them on the side of the slide. If you have a ton of vocab words, you can put them all around the outside of the slide if you need to. Below I have examples of what it might look like with gray boxes or with transparent boxes, where only the words will appear visible.


We are now ready to make our "Student" set of slides. This is where the magic happens! We will create the interactive slide where everything is "locked-in" and the students can only use the interactive pieces, which in this case are the vocabulary words or boxes. What you will need to do is create an image of the slide we just created by downloading that slide as a JPEG. To do that, make sure you have selected the slide we just made in our "Prototype" set of slides. Go to "File" - "Download" - and select "JPEG." You have now just created an image of your vocabulary slide.
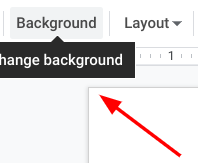
Now click over to your "Student" set of slides. Get rid of any text boxes that may be there that you don't need. We are going to take the image we just downloaded and make it into a "Background" for our "Student" set of slides. This will make it so that students cannot manipulate anything on the slide except for the vocabulary boxes, which we will create in a minute. When you click on the blank slide, you will notice a box that says, "Background." You will need to click on "Background," then select "Choose Image." Select the image that we just downloaded, and then click "Done." You now have your image as a background and it's ready to have the interactive pieces added!


We are on to our final steps for creating the interactive slide. All we have to do now is Copy the vocabulary word boxes from our "Prototype" and Paste them onto our "Student" copy of slides. So go to the "Prototype" slide and select all of the boxes you can as a group. Copy them. Go to your "Student" slide and Paste. Done! Piece of cake!

Your student slide is now ready to be shared. The students cannot move anything on the slide because it is all part of the background, but they can freely move the vocabulary pieces to the proper places. You can easily share this with your students through Google Classroom. Make sure you select "Make A Copy For Each Student" when making the assignment in Google Classroom.

As you get more comfortable making these interactive slides for your students, you will soon see that there are so many cool things that can be done with them. There are a ton of teacher creators out there making really cool Interactive Digital Notebooks. To check out my Interactive Digital Notebooks, you can visit my TpT STORE. There are video previews for everything, so you can see exactly how everything works.
Here are a few of the Digital Interactive Notebooks I currently have available:


Comments